Move Accounts
You can use the Move Accounts action to move student accounts to a different phase in the collections process. You can move an account between individual collectors, move accounts to a shelved 'bucket', or move accounts into placement with a third party.
If an account is being moved into an agency placement, validation will be performed to ensure the account has the required Regulation-F fields and values to be placed with a collection agency. For more information, see Validation Error Resolution.
The collection phases are configured for your institution, but they may include pre-collect, internal collections and agency management.
In the Pre-Collect phase, past due students are automatically engaged by the SFS to enroll in a payment plan or pay their balance in full.
You define the payment plan offers and communications for your institution.
You configure how long the Pre-Collect phase lasts and the pre-determined intervals when Flywire sends payment plan offer communications.
If you have the Internal Collections phase configured, the system will automatically move the accounts which have not enrolled in a payment plan or made payment in full to the Internal Collections phase when the Pre-Collect phase is complete.
In the Internal Collection phase, Customer Service Representatives (CSRs), Collectors, and Managers work directly with students to negotiate a payment arrangement.
Collectors can negotiate a custom payment plan with a student and send them an offer to enroll.
Your Managers and CSRs can use the SFS dashboards to see the daily work queue and view available reports and analytics.
At the end of the Internal Collection phase, the accounts which have not enrolled in a payment plan or made payment in full may be automatically placed for first round with collection agencies or any other configured placement such as Shelved.
The Agency Management feature allows you to integrate collection agencies with your SFS collection management. With agency integration the SFS can automatically place student accounts in their first placement with collection agencies, allow manual reassignment to second and third agency placements, and post payments made to an agency back to the SFS.
Selecting Which Accounts to Move
Selecting Multiple Payers to Move
-
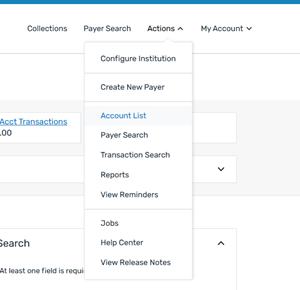
Select the Actions menu and click Account List.
-
Select the accounts you want to move.
You must select accounts that are moving to the same location, you cannot move accounts to different locations in the same move action.

-
Click the Move Account(s) button.
Selecting a Single Payer
-
Search for the payer using the Payer Search function.
 How to search for a user
-
Click Payer Search in the SFS title bar.
-
Enter information in at least one field to search for a payer.
-
Click Search.
Search results are limited to 200 payers.
-
Select the payer from the list of results.
Search criteria
You can search for payers using the following criteria.
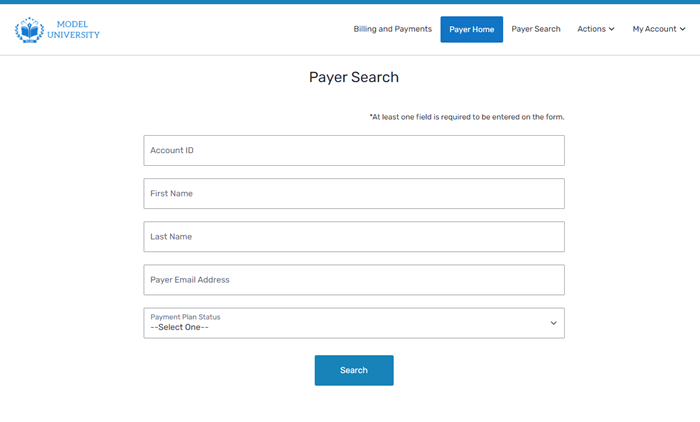
Account ID The Account ID is an identification code you use for the payer in your student information system (SIS).
First Name The payer's first name.
Last Name
The payer's last name.
Payer Email Address
The payer's email address.
Payment Plan Status The status of the payment plan.
Payment Plan Status
The status of any payment plan will be one of the following:
Active
The payer has provided payment (credit card or bank account) information, accepted the terms, and has not defaulted.
Cancelled
Your institution has rescinded the payment plan and the remaining account balance is due in full.
Completed
The payer has paid the balance in full outside of the payment plan system. Completed plans cannot be re-activated.
Defaulted
The payer has missed a number (established by your institution at implementation) of installment payments.
Offered
The payer has not yet entered payment information (credit card or bank account) and accepted payment plan terms.
Paid in Full The payer has paid the entire balance. -
-
Select the payer from the list of results.
-
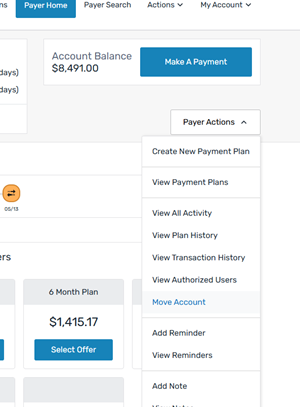
On the Payer Home page, click the Payer Actions menu and select Move Account.
How to move accounts
-
On the Where Would You Like To Move These Accounts? page, select the move location in the Move Accounts To drop-down list.
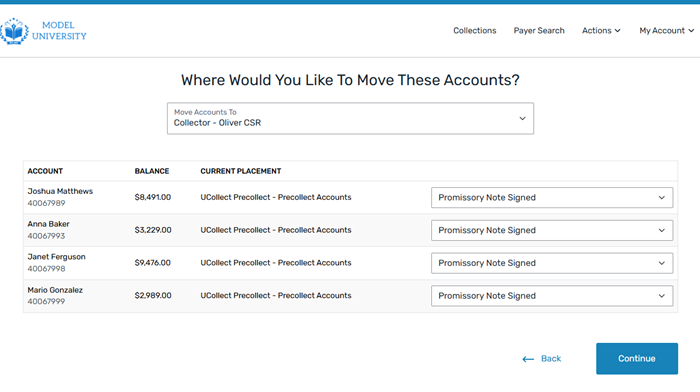
-
Verify that the promissory note status is correct.
What is a promissory note?
A promissory note is an agreement signed by the payer that acknowledges their financial responsibility. The promissory note indicates the student is liable for the collection fees charged by an agency while collecting the balance.
The financial responsibility agreement is included in an account's placement file when they are loaded into SFS Collection Management.
-
Click Continue.
-
Verify everything is correct on the Almost Finished, Everything Look Good? page.
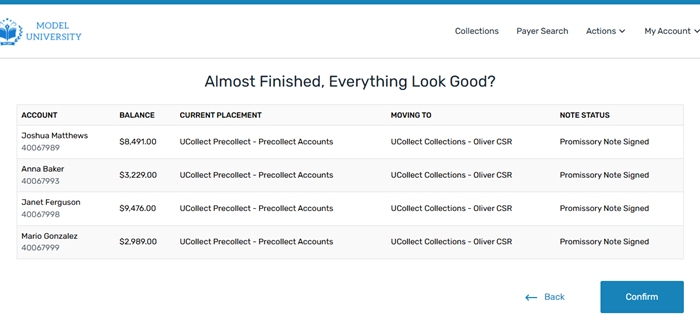
-
Click Confirm.
The Moved Account Results page displays with the status of the account move.
