Viewing and Updating My Account Information
The My Account menu allows students or Authorized Users to edit the information on their own account. These pages allow a payer to manage their payment methods, who can access their account, and their personal account information.
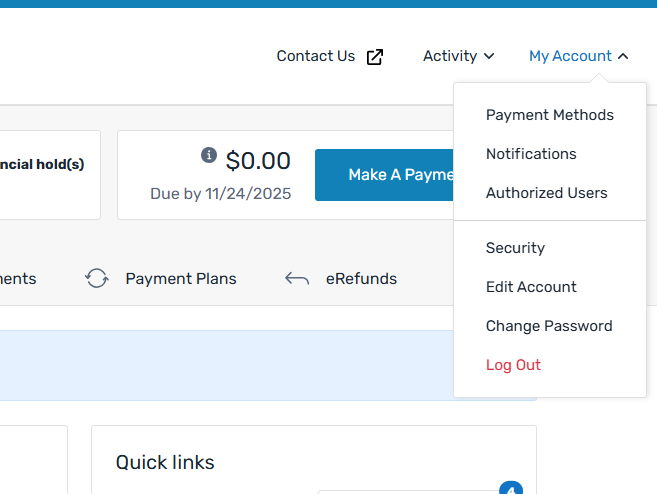
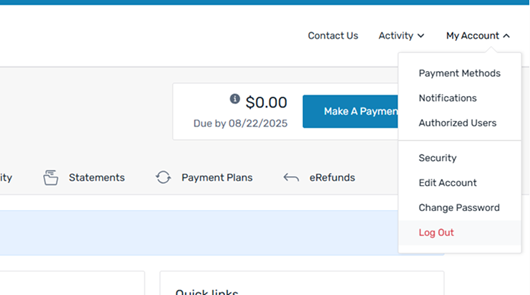
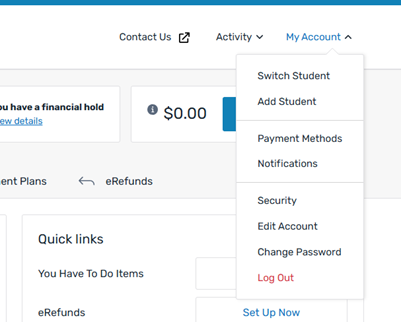
My Account menu
The My Account menu is located in the upper right hand corner of the SFS.
Manage Payment Methods tab
Students and Authorized Users can view and manage their saved payment methods. Payers can save a payment method when they are making a payment or enrolling in a payment plan.
On the Manage Payment Methods tab, a student or Authorized User can click the three dots at the end of the row to Edit or Delete their saved payment methods.
Deleting a payment method will remove it from this page and from the list of payment options, it does not remove it from a payment plan, scheduled payment, or as the enrolled method for eRefunds. You must update the payment plan, scheduled payment, or eRefunds selection to stop using the payment method.
If you want to change the payment method associated with a payment plan, you can update it by clicking Manage Auto Pay on the Payment Plans tab.
Notifications tab
Students and Authorized Users can view and update the email address or phone number where they receive notifications from the SFS.
This does not change the email address a payer uses to log in to the SFS or your SIS/ERP.
When a payer updates their email address or phone number, they must agree to the Terms of Use and Privacy Policy.
A payer agrees to the Terms of Use and Privacy Policy when they use Flywire to send and receive payments.
Payer Terms of Use
The Payer Terms of Use inform the payer about the rules and guidelines.
Privacy Policy
The Flywire Privacy Policy informs the payer about the information Flywire collects and the choices the payer can make about the handling of their information.
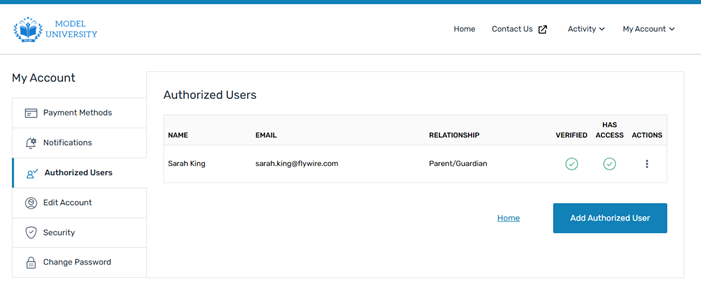
Authorized Users tab
Students can add and manage the Authorized Users who have access to their account.
An Authorized User is an individual that a student has allowed to access their account. An Authorized User can be any person, such as a parent, grandparent, spouse or employer. There is no limit to the number of Authorized Users a student can add to their account.
For an overview of Authorized User functionality, see Authorized Users.
When a student grants the Authorized User access, they will have access to financial details and personal information in the student's account. Giving a person authorized user access means the student has agreed to release private information that is protected by laws such as the United States (US) Department of Education Family Education Rights and Privacy Act (FERPA).
When the Authorized User is granted access, they can perform the same actions as a student - including view the account balance, make payments, and view account activity.
The SFS can notify students about their rights under the Family Educational Rights and Privacy Act (FERPA). FERPA is a federal law that protects the privacy of student education records. When a student creates an Authorized User or allows an Authorized User access to their account, they acknowledge that protected information will be shared with the Authorized User.
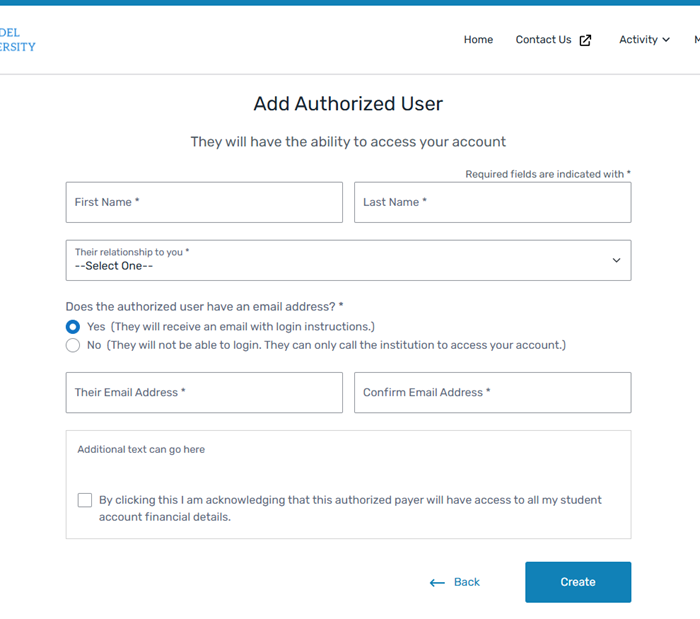
Adding an Authorized User
Students can add an Authorized User and immediately grant them access to the student's account. If the Authorized User does not have an SFS account, the Authorized User will need to verify their email and create an account.
-
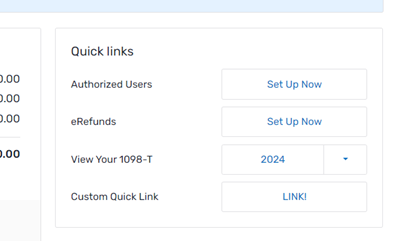
Click the quick link for Authorized Users or select Authorized Users from the My Account menu.
The Authorized Users tab in the My Account page displays.
-
Click Add Authorized User.
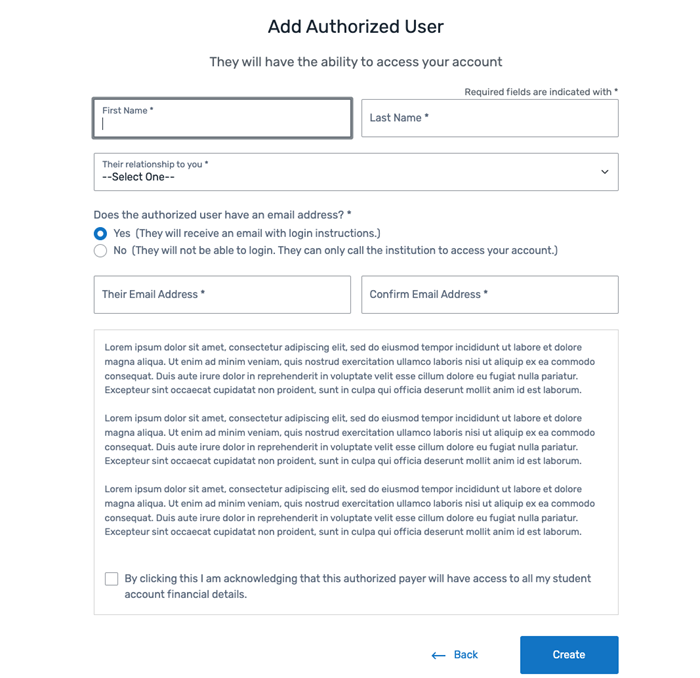
The Add Authorized User page displays.
-
Enter the Authorized User's information.
-
Click Create to add the Authorized User account.
If the Authorized User does not have an account, SFS will send them an email with log in instructions.
On the page
|
|
Manage an Authorized User
A student can use the three dots at the end of the Authorized User's row to:
-
Edit - Edit an Authorized User's information.
-
View Activity - View the Authorized User'sSFS activity.
-
Resend Link - Resend the Authorized User a link to log in to their SFS account.
-
Revoke Access - Revoke an Authorized User's access to your account. This is only available if the Authorized User has already been verified.
-
Delete - Delete an Authorized User from the student's account. This is only available if the Authorized User's account has not been verified.
This does not delete the Authorized User's account from SFS.
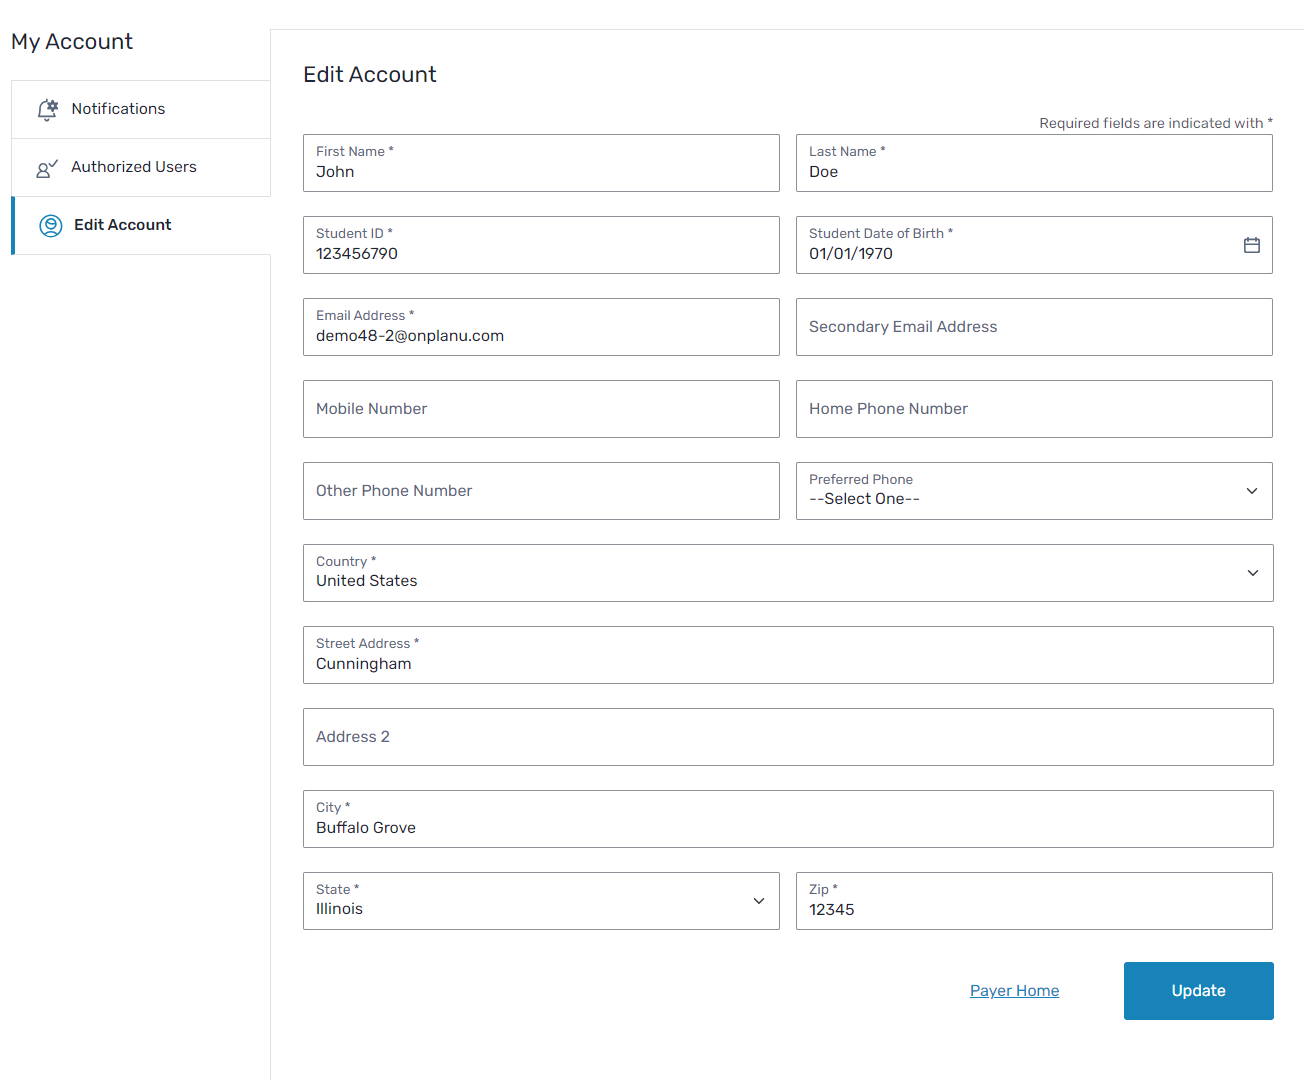
Edit Account tab
A student or Authorized User can update their email, phone number, and address information. Their name, student ID, and date of birth is managed in your SIS/ERP.
For instructions on creating or updating a user, see Create and Update Payers.
If a payer logs in through SSO or pass-through, they are not able to see or manage their personal information. This information is managed in your ERP or SIS.
|
|
When a payer updates their email address, phone number, or physical address, they must agree to the Terms of Use and Privacy Policy.
A payer agrees to the Terms of Use and Privacy Policy when they use Flywire to send and receive payments.
Payer Terms of Use
The Payer Terms of Use inform the payer about the rules and guidelines.
Privacy Policy
The Flywire Privacy Policy informs the payer about the information Flywire collects and the choices the payer can make about the handling of their information.
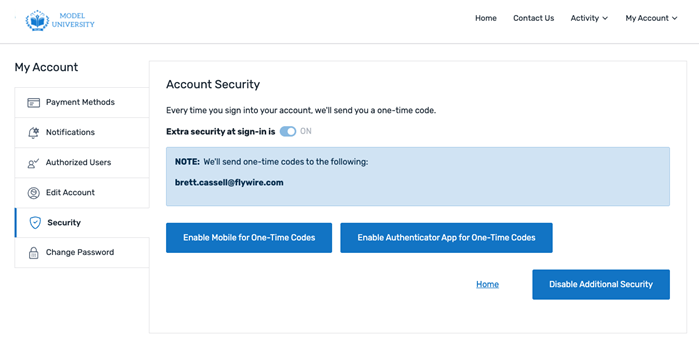
Account Security tab
If your institution has enabled multi-factor authentication for students or Authorized Users using direct login, the payer can enable, update, or disable their multi-factor authentication for their account.
If the
Multi-factor authentication is when a user logs into the SFS and a second method of verification is requested by Flywire. A user who has enabled multi-factor authentication will be required to enter a code after they enter their username and password.
For more information about multi-factor authentication, see Multi-Factor Authentication.
Changing a Multi-Factor Authentication method
-
Select the My Account menu and click Security.
The Account Security tab appears.
-
You can change your multi-factor authentication method:
-
Click the Enable Mobile for One-Time Codes button to send the security code as an SMS message.
-
Click the Enable Authenticator App for One-Time Codes button to send the security codes using an authenticator app.
-
Click the Disable Additional Security button to disable a multi-factor authentication method for your account.
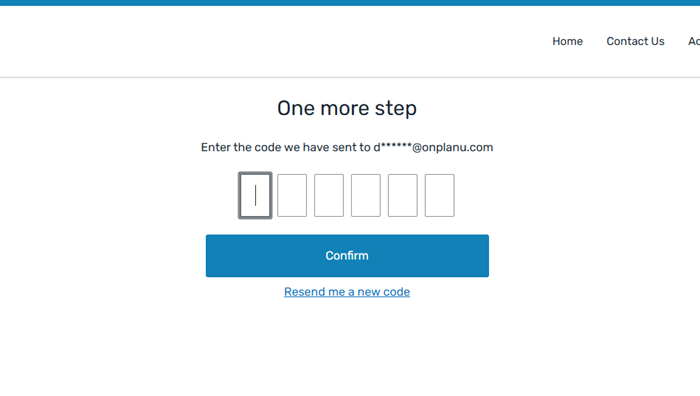
The SFS sends you a 6-digit code and the One more step page appears.
-
-
Enter the security code to enable your authentication method.
The Account Summary tab displays with a Success! Extra security has been enabled banner.
The multi-factor authentication method is now enabled.
The next time a user logs in they will have the option to select the Remember Device for 30 days checkbox, which allows them to log in on this device for 30 days without having to use an email code.
Disabling Multi-Factor Authentication
-
Select the My Account menu and click Security.
The Account Security tab appears.
-
Click the Disable Additional Security button to disable a multi-factor authentication method for your account.
-
Click the toggle to select which authentication types to remove. You can disable one or all authentication methods for your account.
The next time a user logs into their account after multi-factor authentication is disabled, the Would you like to secure your account? page opens and the user is prompted to enable multi-factor authentication again.
Change Password tab
A student or Authorized User can change their account password if they log in using direct login.
An SFS password must contain:
-
A minimum length specified by your institution. The default is 8 characters.
-
At least one uppercase and lowercase letter.
-
At least one special character.
-
At least one numeric character.
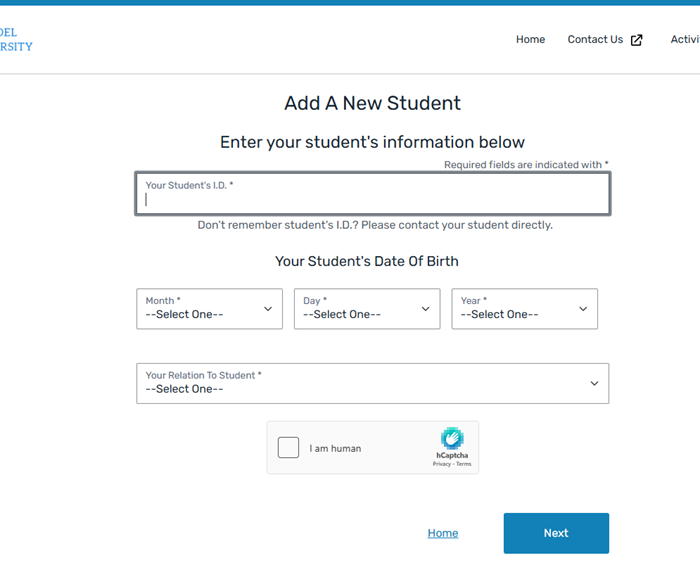
Add a New Student page
An Authorized User can request to access a student's account using the My Account menu.
-
Click the My Account menu.
-
Select Add Student.
The Add a New Student page displays.
-
Add the information for the student account you want to access.
-
Click the check box to confirm you are human.
-
Click Next.
Flywire sends a notification to the student. The student must approve your access to their account.
On the page
|
|
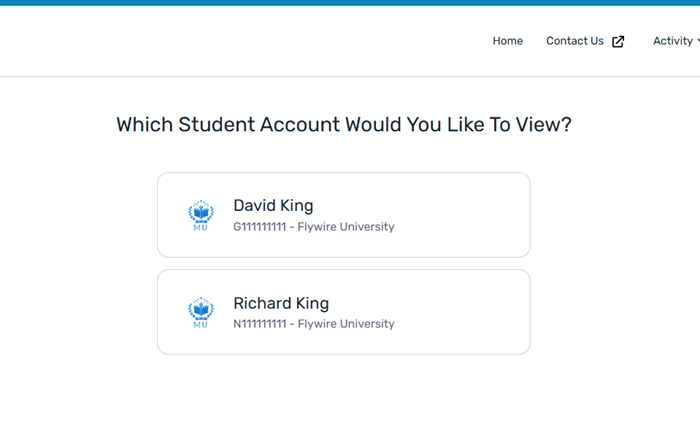
Which Student Account Would You Like to View? page
An Authorized User can use the Switch Student option in the My Account menu to switch between different student accounts.